Properly Framing and Building Walls
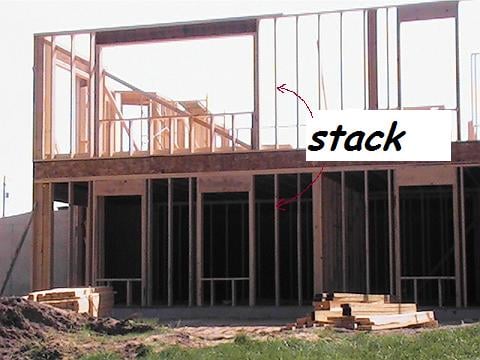
The first thing to know when framing and building walls, is that you will need a bottom plate and two top plates to attach the wall studs to. The double top plate is needed to comply with building code. Code requires a double top plate for load bearing walls. Layout the bottom plate and one of the top plates at 16″ on center. That means you will place wall studs every 16 inches. This is a typical spacing for most residential construction. Place your door openings where you want them and layout the correct rough opening size. When building new construction or remodeling, it is best to stack your wall studs directly over the floor joist. Guess what? Fortunately, most floor joist are also placed on 16″ centers. There are many reason do this, let’s start with the obvious:- Strength of the building is increased as every stud bears directly over the floor joist, which in turn is bearing directly on the foundation
- Mechanicals such as heating and plumbing are much easier to run from floor to floor Studs stack over each other in stairwells
- Future renovations or after thought wiring will be less difficult
- Wall sheathing and drywall panels install with less cutting
Framing Your Door Rough Opening Correctly Will Make Installing Doors Go Smoothly
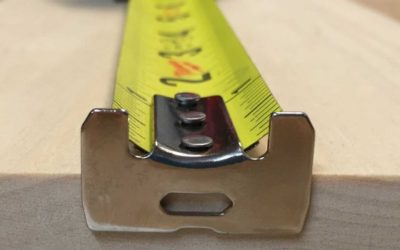
First, you must determine the size of your door. Measure the door if you already have it. If you don’t, take the actual door size you will be installing and add 2 inches to the width and two and one-half inches to the height, This will give you the correct rough openings. The reason for the extra space is to allow room for the door frame and for space to adjust the door. Once you have all this information, it’s just a matter of where you want your door.
Decide the location by taking into consideration the traffic flow and the size of items you will furnishing the room with. In bedrooms it’s best if you can swing the door against a wall. Frame the opening close to the corner if possible, just be sure to leave enough room for the size of trim you will be using.
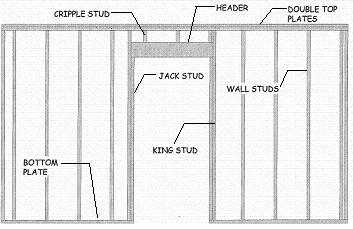
Always use two studs on each side of the opening. The first will be continuous from the top plate to the bottom plate. This is called a king stud.
The next jack stud will be cut to the height of your door plus 2-1/2″ and minus the thickness of the bottom plate 1-1/2″ as it will rest on top of this. So your jack stud should be cut at 81″ for a 6-8″ tall door. Your header size is determined by the load it carries.
If you are building a new bearing wall or cutting in a new doorway be sure to check your local building code span charts or consult an engineer to properly size the header. Once you know the depth of the header, it’s width is cut to fit from king stud to king stud, with the jack studs fitting under it to help disperse the loads.
A typical header width with single jack studs is cut 3″ larger than the rough opening.
An example: A 36″ door has a rough opening width of 38″ so your header is cut at 41″. Also, be aware double or triple jack studs may be required based on the opening width and the load the header carries. Be sure to check code requirements prior to framing.
Need Help With Building a Door or Window Header?
It sounds so confusing – load bearing, non-load bearing, span and load. These are all term to describe and calculate door and window header sizes. It’s not really that difficult if you break it down into simple descriptive terms.
What Exactly is a Header?
Think of a header like a small bridge. We recently visited the Mackinac Bridge in Northern Michigan. The purpose of the bridge is to “span” the gap in the land and allow the “loads” of cars and trucks to cross without plunging into the water below.
The Mackinac Bridge “span” is 5 miles long, with many intermediate support pillars. I’m sure none of your door or window headers will be that long, but the principal is really the same. A door header allows you to create openings, transfer those weights to the studs beside the opening and then to the foundation, much like the pillars do in a bridge. Now we know how they work, but how do we know what size to use? That’s where it can be complicated.
There is no standard size header, no one size fits all. It all depends on the width of the opening, the weights resting on the top of the header and the various external factors such as the extra weight of snow, wind and rain. Not to mention those external factors called live loads, change by geographic location.
Sizing Headers
When I first started building over 20 years ago. We framed door and window openings with 2-2×12’s with 1/2″ plywood sandwiched in the middle over most all the exterior openings. This works out well because:
- The finished 3-1/2 in. thick headers (1-1/2 in. plus 1-1/2 in. plus 1/2 in.) were the same thickness as the 2×4 wall framing.
- When we installed the headers even with the top of the standard 92-5/8 in. high studs, it established just the right height for windows and doors.
Architects and engineers who designed the houses had calculated that 2×12″ headers were normally deep enough and sturdy enough to span most smaller openings. The problems can occur on the larger openings. Often 2-2×12’s are not strong enough to support these wide openings without sagging. This is where engineered lumber in the forms of LVL’Door and Window Headers and GluLam’s can be useful. These beams or headers each have their own engineering formula, so calculations on these need to be done professionally. Another resource could be a Building Code book. Many codes have span tables that have pre-determined spans associated with the loads required for your area.
These are most helpful for those simple header sizes usually under 6 foot. Here are a few tips:
- Engineered lumber almost always can carry more weight than lumber.
- A sandwich header of 2-2×12’s and plywood works for most openings under 3 feet wide, unless you have special considerations such a concentrated load called a point load. This situation calls for a qualified engineer or architect.
- The wider the opening, the stronger the header needs to be.
- The wider the opening the more jack studs (pillars) you need to hold up the header.
- ALWAYS consult with someone qualified if you have any doubt. Sagging headers, or even a collapse is possible if your header is undersized.
Building Basement Walls
Building a new wall while finishing your basement is a relatively simple task that even a homeowner can tackle with a few pointers. The first step is to verify with your local building department to see if you will need a building permit. Most all codes require a means of egress from the basement when their is habitable space. If you are building a new home, most codes require means of egress from a basement, regardless of having any habitable space. This can be accomplished with an egress window, that has minimum size and height requirements. The key here is to ask your local jurisdiction first.
Once you have the green light to start construction, start by determining the materials you will need to complete the wall framing. Layout the walls on the floor by measuring and snapping chalk lines where the bottom plate of the walls will rest. Be sure to check the chalk lines for square. It is easier to re-snap a chalk line then to move a wall.
Measure all the areas where the walls will rest on the floor to determine the linear footage of plate your project requires. Don’t forget to add in the top plates of the wall. It will take the same amount of linear footage for the top as the bottom unless the walls are load bearing.
- If the bottom plate rest on concrete, it must be treated or a certain species in order to be in contact with the concrete.
- If your walls are non-load bearing a single top plate is all that is required. If they are load bearing a double top plate is required.
When framing in 16″ centers, a good rule of thumb when figuring material, is one wall stud per foot of bottom plate. This will usually give you the extra studs needs for corners and door openings. If you want to get closer, here is a site with a wall construction calculator.
Measure and cut the plates accordingly based on the chalk lines snapped. Layout all the wall studs on the top and bottom plates prior to nailing them in place. If you have enough room, build your wall laying down on the floor, this will allow you to face nail all the wall studs in place.
Don’t forget, you will need space to stand the wall up also. If you don’t have room, nail the bottom and top plates in place first, then toenail the wall studs into place.
Door Installation Has Never Been Easier
- Install 5X Faster
- Eliminate Shims
- Perfect Fit Every Time